public-api-docs
MaaS Usage Guide
Overview
The Wunder Mobility MaaS API enables authorized applications to manage users and perform actions on their behalf through impersonation. This allows MaaS providers to integrate shared mobility services (bikes, scooters, cars) into their platform using a single API client while maintaining individual user tracking and analytics.
Who This Guide Is For: Developers building MaaS (Mobility as a Service) applications that need to manage user accounts and facilitate vehicle rentals through the Wunder Mobility platform.
| Related Documentation: User API | MaaS specific API endpoints | API Basics | Error Codes |
Prerequisites
Before you begin, ensure you have:
- API Client Credentials: API ID and API key provided by your Wunder Mobility operator
- Operator Configuration: Information about your branches, user groups, and rental requirements
- Impersonation Permission: Your API client must be authorized for impersonation
- Basic Understanding: Familiarity with API Basics, including authentication and error handling
Key Concepts
Impersonation
Impersonation allows your API client to perform actions on behalf of users you’ve created, without managing separate authentication tokens for each user.
How It Works:
- Your API client authenticates once and receives access/refresh tokens
- You create users in the Wunder Mobility system via the API
- You store each user’s UUID (
impersonateUuid) in your system - When making requests on behalf of a user, include their UUID in the
GoUrban-ImpersonateHTTP header
Security: You can only impersonate users that your API client created. This prevents unauthorized access to users created through other channels.
Example Header:
Authorization: Bearer {your-api-client-token}
GoUrban-Impersonate: {user-uuid}
User Types
| User Type | Description | Use Case |
|---|---|---|
| API Client | Your application’s service account | Authenticates to the Wunder Mobility API and manages impersonate users |
| Impersonate User | End users created by your API client | Individual users of your MaaS application who rent vehicles |
Branches and Internationalization
A branch represents a geographic/operational region. Key considerations:
- Home Branch: Determines where a user can rent vehicles without roaming
- Branch Resolver: Use GET /branches/resolve to find the appropriate branch based on user location
- Roaming: Users outside their home branch have limited functionality (pay-as-you-go only)
See API Basics - Internationalization for more details.
Getting Started
Step 1: Authenticate Your API Client
Sign in with your API credentials to obtain access and refresh tokens. These tokens authorize all subsequent requests.
Endpoint: See Authentication for detailed instructions
Important: Store both tokens securely. Use the access token for API requests and the refresh token to obtain new access tokens when they expire.
Step 2: Create a User
Create a new user in the Wunder Mobility system that you’ll manage and impersonate.
Endpoint: POST /customers
Required Fields:
firstName,lastName,birthDate: User detailsbranchId: User’s home branch (use branch resolver to determine)
Additional Fields: Depending on operator configuration, you may need to provide phone number, email, address, or other information. Check with your operator for specific requirements.
Response: Returns a user object including impersonateUuid - store this UUID to impersonate the user in future requests.
Tip: Use the customProperties field to store your internal user ID for easy cross-referencing.
Step 3: Fetch Reference Data
Before showing vehicles to users, fetch and cache reference data:
- Branches: GET /branches - Available service areas
- Vehicle Categories: GET /vehicle-categories - Vehicle types (e-scooter, e-bike, etc.)
These endpoints provide metadata you’ll need to display vehicles and understand their characteristics. Cache this data and refresh periodically.
Complete Rental Flow
This section walks through the full lifecycle of a vehicle rental, from vehicle discovery to rental completion.
1. Accept Terms & Conditions
Before a user can rent vehicles from a branch, they must accept that branch’s Terms & Conditions.
When T&C Acceptance Is Required:
- User’s first rental in a new branch
- When T&C have been updated (you’ll receive error codes U601 or U602)
Workflow:
- Retrieve T&C: GET /terms-and-conditions?branchId={branchId} or GET /terms-and-conditions?vehicleId={vehicleId}
- Display to User: Show the T&C text to your user
- Accept T&C: POST /termsandconditions with the T&C ID
Note: Include the GoUrban-Impersonate header with the user’s UUID for all T&C requests.
2. Fetch Available Vehicles
Retrieve vehicles available to the user at their current location.
Endpoint: GET /vehicles (with impersonation header)
Response: Returns a list of vehicles with:
- Location (latitude/longitude)
- Battery level
- Vehicle category ID (cross-reference with cached categories)
- Pricing information
- Promotional flags
Vehicle Details: Use GET /vehicles/{id} for detailed information including applied discounts.
Refresh Strategy: Poll this endpoint periodically to keep your vehicle map up-to-date (typical interval: 30-60 seconds).
3. Create a Rental
Users can either reserve a vehicle for later use or start renting immediately.
Endpoint: POST /rentals (with impersonation header)
Required Fields:
startRentalState:RESERVATION: Reserves the vehicle for a specified timeACTIVE: Immediately activates the vehicle and starts billing
vehicleCodeORvehicleId: Identifies the vehicle (usevehicleCodefor QR code scans,vehicleIdfor map selection)userGroupCode: Billing group identifier (provided by your operator)
Optional Fields:
additions: Additional services (e.g., helmet rental)paidReservationMinutes: For paid reservation periods
Response: Returns a rental object with rental ID - store this to manage the rental.
4. Manage the Rental
Control the rental state using rental operations.
Endpoint: POST /rentals/{rentalId}/rental-operations (with impersonation header)
Available Operations:
| Operation | From State | Effect | Billing |
|---|---|---|---|
START |
RESERVATION | Activates vehicle, begins ride | Billing starts |
PARK |
ACTIVE | Turns off vehicle, allows breaks | Billing continues |
DRIVE |
PARKING | Reactivates vehicle | Billing continues |
OPEN_TAILBOX |
Any | Opens helmet compartment | No effect |
END |
ACTIVE/PARKING | Deactivates vehicle, ends rental | Billing ends |
Example: To pause during a rental, send PARK operation. To resume, send DRIVE operation.
5. End the Rental
Complete the rental and calculate final charges.
Endpoint: POST /rentals/{rentalId}/rental-operations with operation: "END" (with impersonation header)
Prerequisites:
- Vehicle must be within a valid business area
- Vehicle must be parked properly (depending on operator rules)
Optional: Upload a photo of the parked vehicle:
- POST /files to upload the image
- Include the returned
fileIdin the END operation request
Response: If successful, returns the rental object with:
- Final price
- Distance traveled
- Duration
- Timestamps
Post-Rental: Optionally, update the rental with user feedback using PATCH /rentals/{rentalId} to include rating (1-5 stars) and feedback tags.
Advanced Topics
Promotions and Geo-Fencing
Promotion Areas offer discounts based on where rentals start or end.
Endpoint: GET /promotions
Promotion Types:
- Start Rental Promotions: Discount for starting a rental in the promotion area
- End Rental Promotions: Discount for ending a rental in the promotion area
- Both: Discount applies to both start and end
Vehicle Promotion Flags: When fetching vehicles, those located in start rental promotion areas will have a promotion flag set. Display these as discounted vehicles in your UI.
Multi-Branch Operations
Users can rent vehicles in branches outside their home branch (roaming), but with limitations:
Roaming Restrictions:
- Pay-as-you-go only (no packages or subscriptions)
- Must accept T&C for each new branch
- May have different pricing
Best Practice: Use the branch resolver to identify the user’s closest branch and set this as their home branch during account creation.
Troubleshooting
Common Rental Errors
| Error Code | Meaning | Solution |
|---|---|---|
| R102 | Active rental already exists | Prevent double-clicking with loading indicators |
| R170 | Vehicle communication failure | Retry the operation - vehicle may have poor reception |
| R131 | Business area violation | Move vehicle inside business area and retry |
| U601 | User hasn’t accepted T&C | Retrieve and display T&C for acceptance |
| U602 | User hasn’t accepted latest T&C | Retrieve and display updated T&C for acceptance |
For a complete list of error codes, see Error Codes. Rental-related errors begin with R, vehicle errors with V, and user errors with U.
Vehicle Availability Issues
If vehicles don’t appear:
- Verify the user’s home branch is correctly set
- Check that T&C have been accepted for the branch
- Confirm vehicles exist in the queried area
- Verify impersonation header is correctly formatted
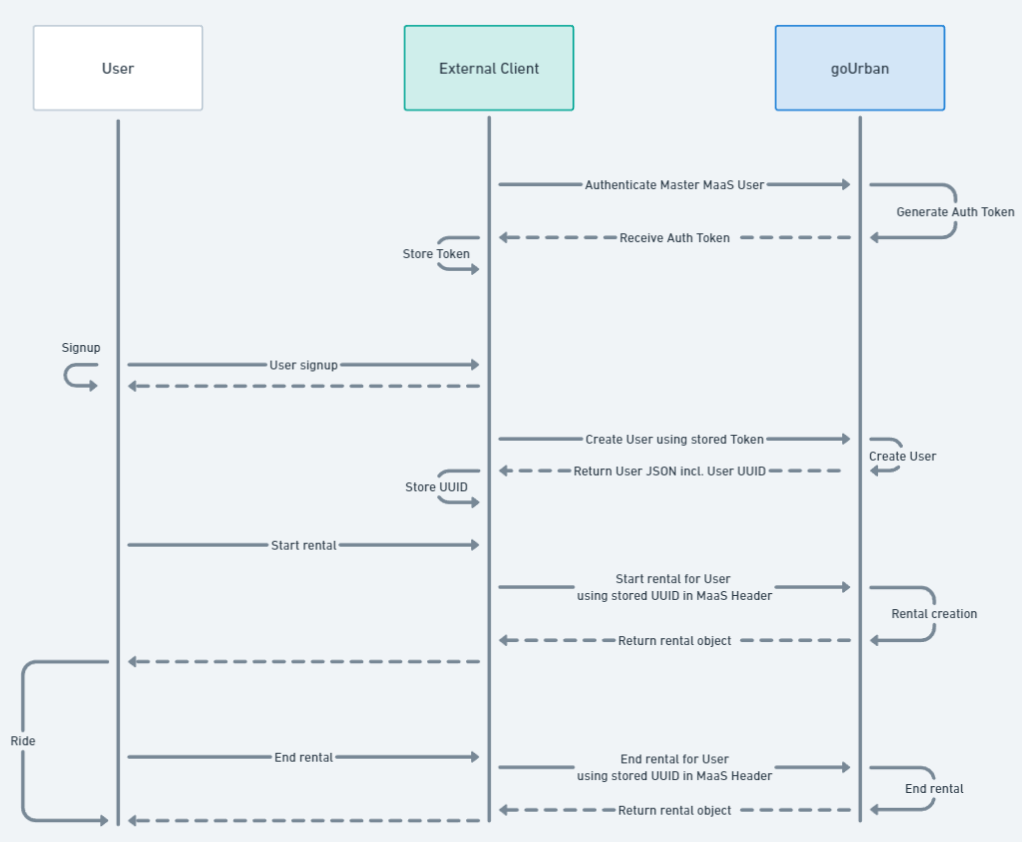
Complete User Journey
The following diagram illustrates the complete flow from user creation through rental completion:

API Sequence Diagram
This diagram shows the impersonation flow and API interactions:
Reference
Related Documentation
- API Basics: Authentication, error handling, internationalization
- Authentication: Detailed authentication and token management
- Error Codes: Complete error code reference
- User API: Full User API specification
- MaaS specific API endpoints: Full API specification for MaaS specific endpoints
Key Endpoints Summary
| Action | Endpoint | Documentation |
|---|---|---|
| Create user | POST /customers | Create Customer |
| Resolve branch | GET /branches/resolve | Branch Resolver |
| List branches | GET /branches | List Branches |
| List vehicle categories | GET /vehicle-categories | List Categories |
| Get T&C | GET /terms-and-conditions | List T&C |
| Accept T&C | POST /termsandconditions | Accept T&C |
| List vehicles | GET /vehicles | List Vehicles |
| Get vehicle details | GET /vehicles/{id} | Get Vehicle |
| Create rental | POST /rentals | Create Rental |
| Rental operation | POST /rentals/{id}/rental-operations | Rental Operation |
| Upload file | POST /files | Upload File |
| List promotions | GET /promotions | List Promotions |